Perusing the internet, I came upon web pages detailing the use of didymium glass filters to do this very trick. Glassblowers have been using the glass in safety glasses for some time so that they can see the melting glass they're working on despite the sodium light of the flame they're working with. Photographers (as contrasted with astrophotographers) use didymium filters to boost the color saturation of the red end of the spectrum (as compared to the more yellowish middle) in landscape photography.
I found several photographers who claimed the Hoya filter to be the best, so I ordered one for my Nikon:

The filter is supposed to knock down the yellow of sodium outdoor lights in particular. After some additional internet skulduggery I found out more about skyglow & filter specifications Here is a compilation of a spectrum from sodium lights & the didymium filter's transmission performance:
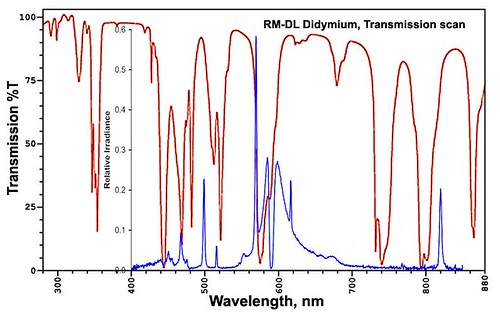
The blue line is the light pollution relative brightness, while the red line is the transmission curve for the filter. The higher the blue line, the brighter the sodium light is for that wavelength. The lower the red line, the less of that color light gets through the filter. So what I want is the "valleys" in the red line to cover up as much of the "peaks" in the blue line as is possible. I carefully aligned the wavelengths (color) for the 2 graphs so that they're as accurate as humanly possible.
You can see that the dip in the red line just below 600nm takes out a bunch of the peaks of the blue line there. It's not perfect, but every little bit helps. The sodium lines that I particularly was interested in is a pair at 589.0 & 589.6nm. This pair of lines is very familiar to chemists & astronomers alike, they're very distinctive.
The blue spectrum line, by the way, is courtesy testone22 and can be found here:
testone22's page in a new window.
And the red line is courtesy of Starna Cells, Inc. a Califormia manufacturer of spectrophotometer cells:
Starna's graphic in a new window.
Starna's home page in a new window.
He informs me that the actual peak has been inverted because of self-absorption (the discovery of which netted Kirchoff the 1862 Rumford medal). Thus the worst part of the light pollution has cancelled itself out! How convenient. Nonetheless, there is ample yellow light on either side of there from the pressure broadening in the high pressure lamps that is coloring the sky and a goodly part of this light is taken out by the filter.
By the way, here's a source for more didymium information:
Wikipedia's didymium page in a new window.
Wikipedia's didymium page in a new window.
Where I came on this fascinating tidbit:
"During World War I, didymium glass was reputedly used to send Morse Code across the battlefields. Didymium did not absorb enough light to make the variation in lamp intensity obvious, but anyone with binoculars attached to a prism could see the absorption bands flash on or off."
Wow! Using the unique spectral signature of the glass to hide the fact that Morse Code was being sent! Triksy hobbitses!
After seemingly innumerable days of clouds & rain (the "new astronomy gear curse"), it was clear enough last night to do an experiment. I quickly drew a little grid on a post-it note with my plan for exposures: 2 min, 4 min & 10 minute, both with & without the filter.
I headed outside with the camera on my fluid head tripod ready for use. I plunked down the camera and carefully framed the shot so that a neighbor's mercury-vapor "security" (aka "the burglar's friend") light was behind a small tree trunk and started a 2 minute exposure. I used the stopwatch feature of my iPod Touch to time the shot. I would have put red plastic over the bright screen but that prevents the touch control feature from working. I vowed to buy a simple stop watch like I used to have back when I worked in TV news.
So far so good, one exposure in the bag, now for a 4 minute shot...
Halfway through this shot, a motion control burglar assistance light came on in another location, off the frame to the right. I moved around to the front of the camera so my shadow was being cast on the lens and thought about what to do. I knew that this new source of light pollution was lighting up any close-by dust in the sky as well as the foreground with a different lighting regimen than the 2 minute shot had, so I decided that this image wouldn't work for me. You may have noticed a certain negative attitude toward outdoor lighting at night. I'll have to work up a blog post about the issues surrounding light pollution & light trespass. Stay tuned!
As the 4 minutes was up then anyway, I ended the shot as I normally would have and thought about my new options. Should I wait out the light and resume the exposure series I had planned on? I decided to press on and get a next shot, the 10 minute one, with me stuck standing in front (but not in the shot) to shade the lens.
I started the exposure and after a couple minutes I had a rude awakening.
Yet another motion controlled light came on! Aagh! This time it's a light that is supposed to scare away deer from a different neighbor's wine grapes. The deer are completely used to the light now and ignore it, but now I had a second source of light pollution that wasn't in either the 2 minute or 4 minute exposures! Worse of all, it was on-camera! I terminated the 10 minute exposure at 3 minutes or so.
Now I'm in a pickle. I have no good options about camera placement and no way to block all 3 lights that were shining in my face. I briefly considered getting out my stepladder and unscrewing the 2 offending lights when one after the other they both went out. Yay! I quickly decided to just get two 4 minute long exposures, one with and one without the filter. I held my breath while the camera's shutter was open and hoped for the best.
Okay, I didn't really hold my breath, but I was nervous, I'll tell you!
Success! Have a look:
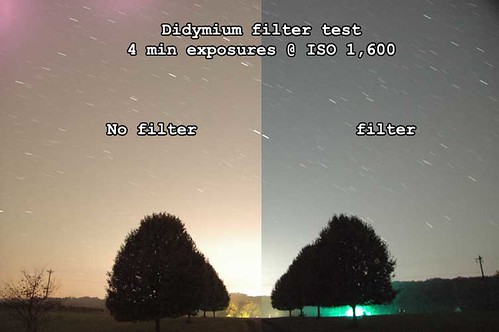
You can easily see the difference between the non-filtered image and the filtered one. The annoying orange skyglow is not so orange any more and the contrast in significantly improved. It doesn't look like a dark sky site all of a sudden, but it is a definite improvement!
My next step in this saga is to make the short trek to McCormick and see what trouble I can get into up there. I'll have to take along my trusty Mac laptop so I can check up on my progress and respond to changes. Maybe Charlottesville will have an unexpected blackout and I can get the real thing!
Yeah, like THAT's ever gonna happen!


7 comments:
Hiya! In case you didn't see my response to your question on my flickr page I figured I'd just repost here.
http://www.flickr.com/photos/79262083@N00/342148466/
"certainly, feel free. as long as you post a link for me to see when it's done! :-)
I wouldn't recommend using it for anything serious though. There are a couple problems with it. First, I took the spectrum simply by pointing the fiber attached to an ocean optics HR2000 spectrometer out the window of our lab toward one of the parking lot lights. So what you're seeing here is what was filtered through about 4 panes of window glass. Second, I can't remember if I compensated for the detector's spectral response here (probably not), so while the wavelengths are extremely accurate, the relative peak intensities probably aren't (ie. it's a silicon detector so those peaks in the blue may be significantly taller in comparison to the ones in the orange region simply due to the low quantum efficiency of Si detectors below ~500nm ( members.misty.com/don/sipdresp.gif )). With those warnings in place though, have fun!
Edit: I took a look at your blog and the trouble you are having finding the sodium D lines is understandable. This is a spectrum of a high pressure sodium lamp, so the D lines are there, they're just inverted! See the upside down peak that touches the x-axis just below 600nm? That's them. The two lines are only separated by like half a nm so this spectrometer doesn't have the power to resolve them separately, but they're there. The reason they're inverted is because of a phenomenon called self-absorption or self-reversal. See the large, wide emission band between 550 and 700 nm? That's the D lines too. They've been "pressure broadened"(see wikipedia) into a very wide band, and near the very center, at 589nm, neutral cooler Na atoms surrounding the hot plasma inside the bulb are actually re-absorbing the light at that wavelength before it has a chance to exit the bulb. Hope this helps. I can give you the raw data in CSV format if you want. Let me know. :) "
Dang the format here... I've tried to make it wider, but I only succeeded over in the main blog, not here in the comments. I'll add your link over in the main blog, so the tail end of your Flickr URL won't get chopped off.
Thanks for the info on your spectrum! Now all I have to do is see if the bulk of city lighting is low or high pressure sodium units. The high pressure broadening in your spectrum's waveform is obvious, now that I know what I'm looking at.
The inverted sodium lines that put a valley in the top of the peak now make sense. I thought maybe the 2 sodium lines had become concatenated into the left hand peak I saw there. I was dubious about that conclusion myself, so I added the bit about your spectrometer having to be out of collimation. (I doubted that your spectrometer was out, so I doubted my conclusion.)
I'll fix the blog post to correct all this weirdness.
Thanks for the correction!
Richard Drumm The Astronomy Bum
hello Mr Drumm
Nice to see you posting again! first of all I know how you can widen your posts, I changed my blog to a new layout etc and researched how to widen it.
below you'll find what I found from someone exactly how to do it. I copied a lady's instructions word for word and kept it for fixing mine. I wanted a new look, found mine too cartoony looking and I bumped up my writing a bit more. I wanted to share how to widen the post with you.
I'm changing my site for more observing and keeping people clued in to what is going on out there. Bumped up my astronomy news.
and past month or so i'm writing sky tours.
Had alot ALOT of emails in request for them.
clear skies to you :)
~~~~~~~~~~~
How to widen your columns on Blogger
I have always wanted my main column wider. I just didn't get why it was so small with all that extra space on the left. I thought I wanted to go with a 3 column layout, but I decided against it. I think I like this better. Here's a tutorial on how to change to a 3 column layout.
Here's what I did to widen my main column and header. Let's start with the header.
Go to Customize, Layout, Edit HTML. Scroll down until you see this (although your number that is in red is probably 660 or something.)
#header-wrapper {
width:950px;
margin:0 auto 10px;
border:1px solid $bordercolor;
background-color:#3d310b;
filter:alpha(opacity=80); -moz-opacity:0.80; opacity:0.80; -khtml-opacity:0.80;
Change the header width number to 950. (I don't know why 950. That's just what I found online when I was looking at how to do it.)
Now scroll down aways until you see this:
#outer-wrapper {
width: 950px;
margin:0 auto;
padding:10px;
text-align:left;
font: $bodyfont;
Again, your number is probably 650 or 660 (I can't remember what it was originally.) Change this to 950 too.
One more thing. So far we've changed the actual blog space. Now we need to change your main post column. Scroll down to this:
#main-wrapper {
width: 650px;
float: left;
padding: 5px;
border:1px solid $bordercolor;
background-color:#3d310b;
filter:alpha(opacity=80); -moz-opacity:0.80; opacity:0.80; -khtml-opacity:0.80;
I think the original number was lik 410. It should be changed to 650.
Now, click Preview and see if your space has widened. If you love it, Save Template. If you hate it or something didn't work, exit without saving.
This is the site that helped me the most. It goes through the steps I showed you above, along with how to make your sidebar wider (which I decided not to do) or how to change to a 3 column layout. I think it's a little easier than the first link.
Hi, Nite Sky!
I have widened the main blog already! I had to fiddle with the code a good bit to get the outlines (those little dashed lines delineating the posts) to reconnect properly, but I got it looking nice again. It's the comments page here that is still narrow.
That narrowness is only an issue with long URLs like "Anonymous" had above. The ASCII text string is still there and can be extracted with cut & paste, though.
Thanks for your help, I'll use your reply to refresh my failing memory and make changes in the future!
Richard Drumm The Astronomy Bum
I'm impressed by your detailed analysis of how didymium glass filters can be used to reduce skyglow.
Post a Comment